How to book an occasional trip
An occasional trip is a trip that will only happen once. There are three types of occasional trips: one way, return trip, and multi trip.
How to book an occasional one-way trip
A one-way trip is one trip from an origin to a destination and does not include a return trip.
1. To book an occasional one-way trip, select “Book a Trip” from the top menu bar.
2. Select “Occasional Trip”.
3. Select the “One Way” option.
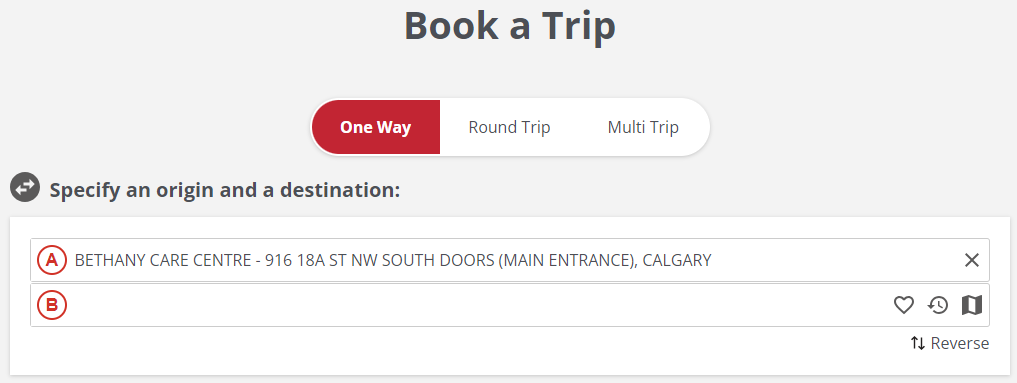
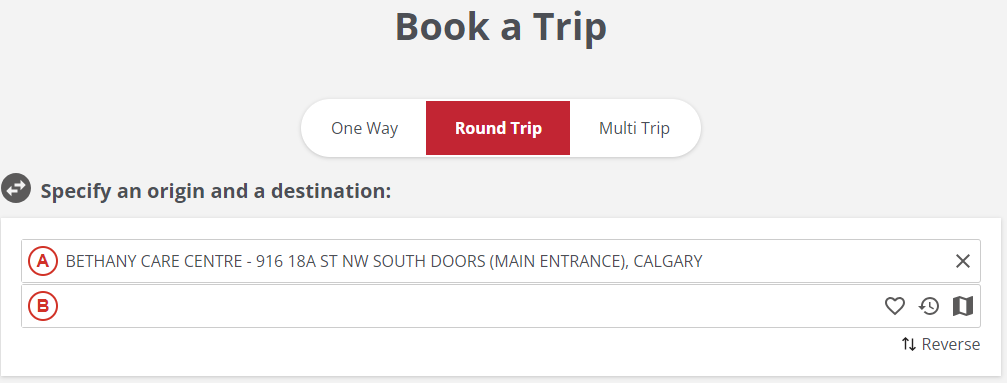
4. Start by filling in your origin, or starting location, labelled “A”. Your home address will be entered by default but can be changed.
5. Type in the address or landmark, click on the heart icon to select from your favourite addresses, or click on the clock icon to select from a list if recent addresses you’ve entered. You can also find the location you want on a map by clicking on the map icon. Landmarks are places that have pre-determined pick-up and drop-off locations and are identified with a building icon. Non-landmarks have a pin icon.
6. Next, fill in your destination, labelled “B”, by typing the address or landmark, selecting a favourite or recent address, or finding the location on the map.
7. To clear the address entered, click on the “X”.
8. If you want to reverse your origin and destination, click on the two arrows labelled “Reverse”.
9. Once you’ve entered an origin and a destination, you can view them on a map by clicking “Show on Map”.
10. To close the map, click “Hide Map” located on the bottom.
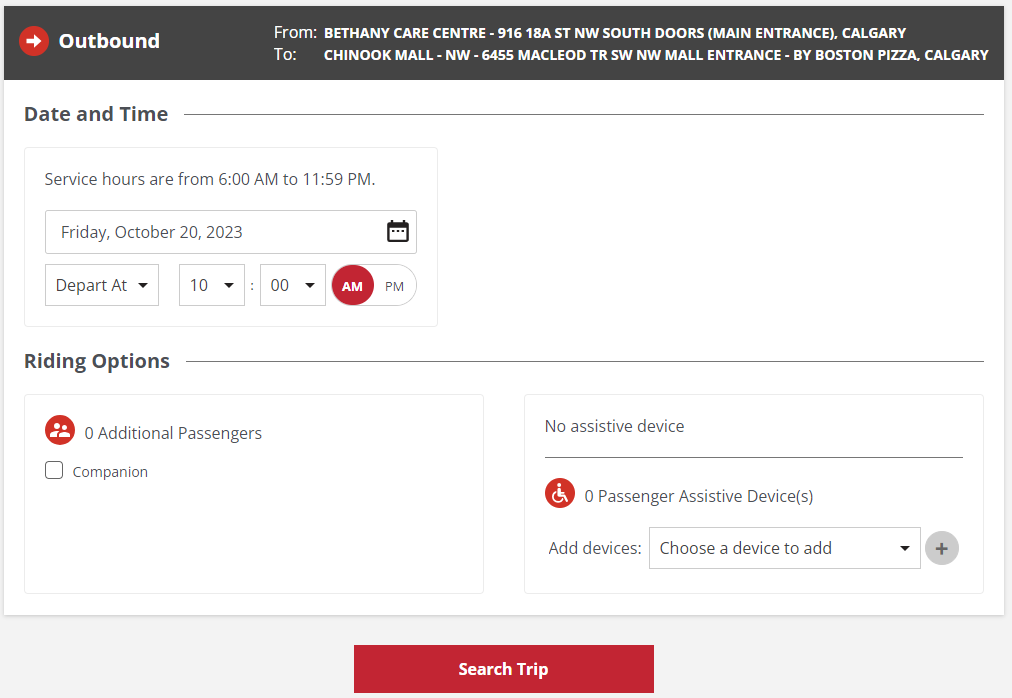
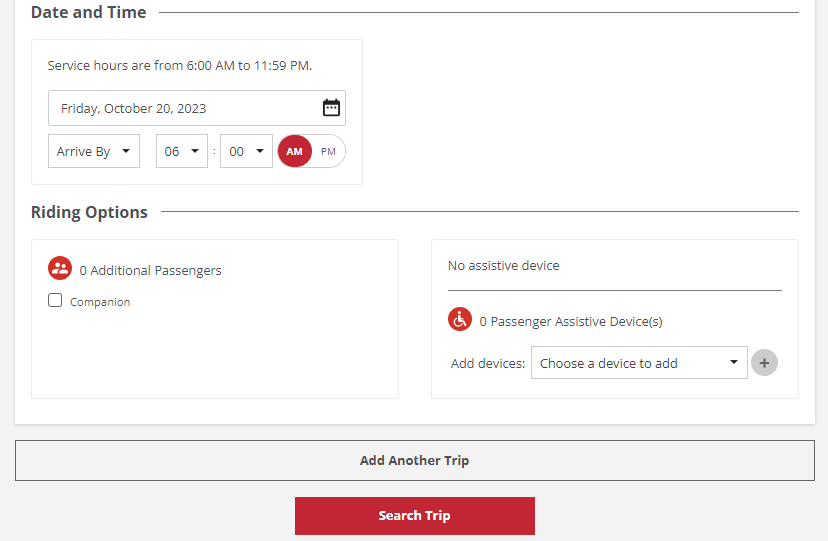
11. Next, choose the date and time of your trip. Click on the calendar icon to select the date. You can book an occasional trip up to 4 days in advance.
12. You can choose between "Depart at" which is the time you want to leave your origin, or "Arrive by" which is the time you want to be at your destination.
13. To select your arrival or departure time, choose the hours and minutes from the dropdown menus, then select AM or PM.
14. Now, choose your riding options. If you are travelling with another passenger, check the “Companion” box.
15. If you have any assistive devices listed on your profile, they will be shown here. If you are travelling with your assistive device, leave this box checked.
16. If your companion will be travelling with an assistive device, click “Choose a device to add”, select the device from the dropdown menu, then click the plus icon to add it to your trip.
17. To remove an assistive device, click on the “x”.
18. Review your trip details and riding options to make sure they are correct, then click “Search Trip”.
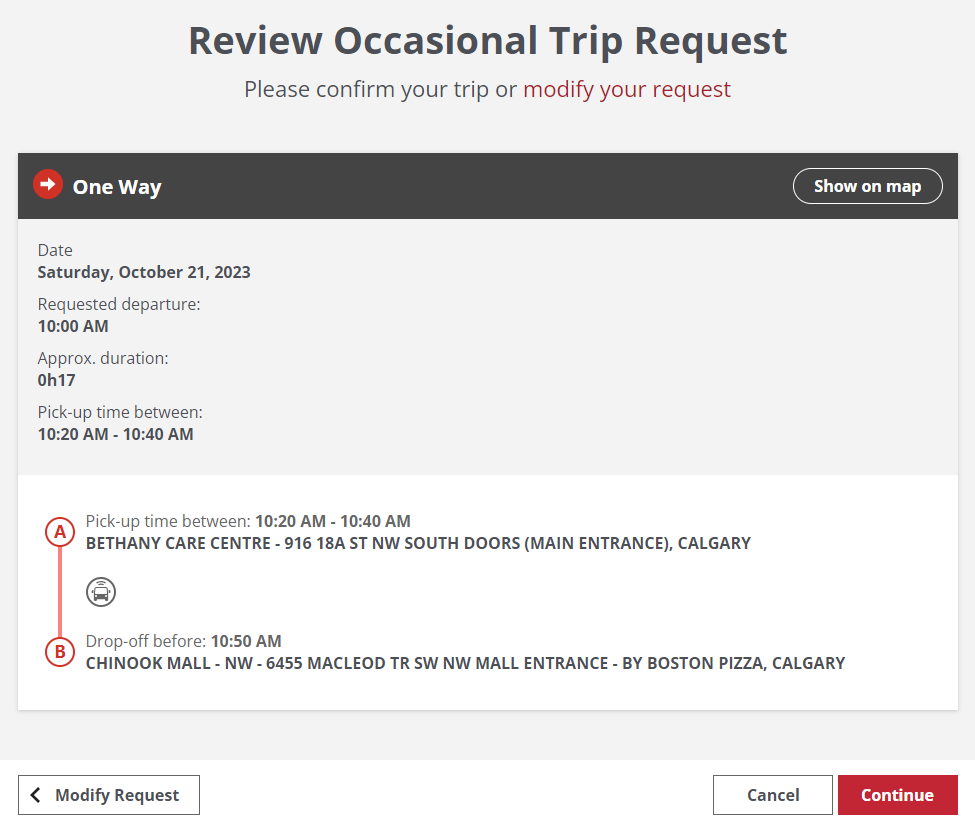
19. You can review your occasional one-way trip details again on this page. If you want to see a map of your trip, click “Show on map”. This will show the location of your origin (A) and your destination (B). Click on the close window icon on the top left to close the map.
20. Click on “Modify Request” if you want to go back and change any details.
21. Click “Continue” if everything is correct.
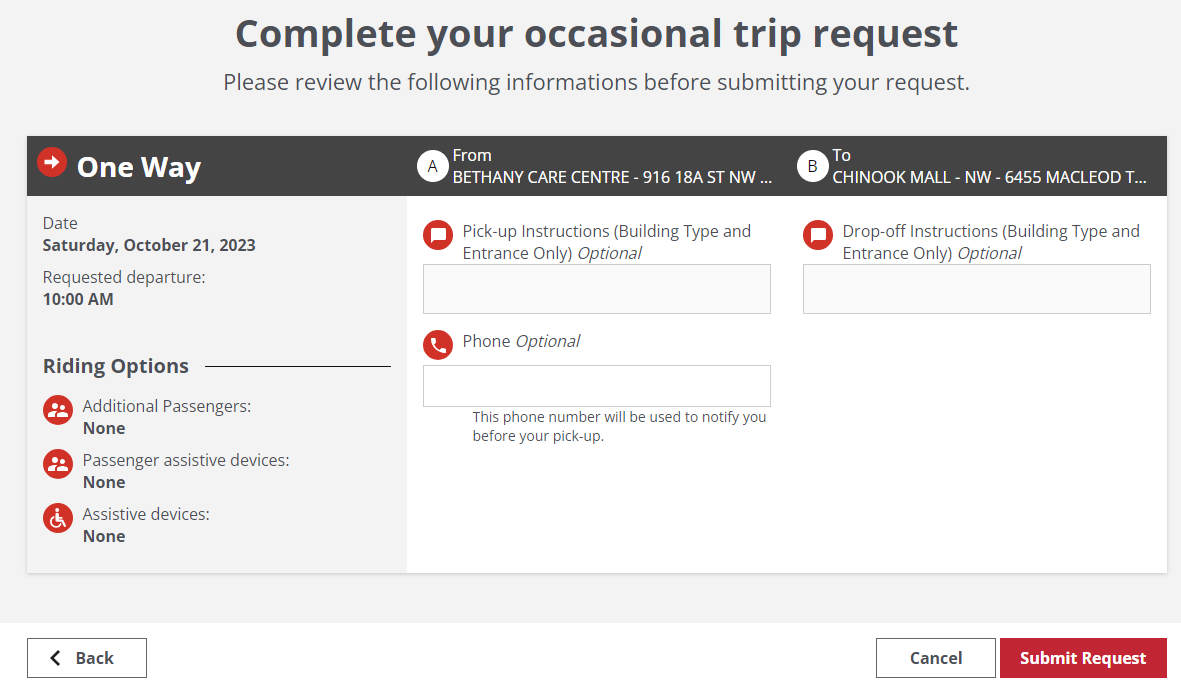
22. If you want to add a building type or specific entrance for an address, you can do that here. For landmark locations, you won’t be able to add custom instructions.
23. Enter a phone number if you want to be notified before your pick-up. The contact number on your profile will be entered by default.
24. Click “Submit Request”.
25. You have successfully booked an occasional one-way trip. From here you can email your trip details, book another trip, view all your scheduled trips, or view your trip details.
How to book an occasional round trip
A round trip is when you travel to a location and back again.
1. To book an occasional round trip, select “Book a Trip” from the top menu bar.
2. Select “Occasional Trip”.
3. Select the “Round Trip” option.
4. Start by filling in your origin, or starting location, labelled “A”. Your home address will be entered by default but can be changed.
5. Type in the address or landmark, click on the heart icon to select from your favourite addresses, or click on the clock icon to select from a list if recent addresses you’ve entered. You can also find the location you want on a map by clicking on the map icon. Landmarks are places that have pre-determined pick-up and drop-off locations and are identified with a building icon. Non-landmarks have a pin icon.
6. Next, fill in your destination, labelled “B”, by typing the address or landmark, selecting a favourite or recent address, or finding the location on the map.
7. To clear the address entered, click on the “X”.
8. If you want to reverse your origin and destination, click on the two arrows labelled “Reverse”.
9. Once you’ve entered an origin and a destination, you can view them on a map by clicking “Show on Map”.
10. To close the map, click “Hide Map” located on the bottom.
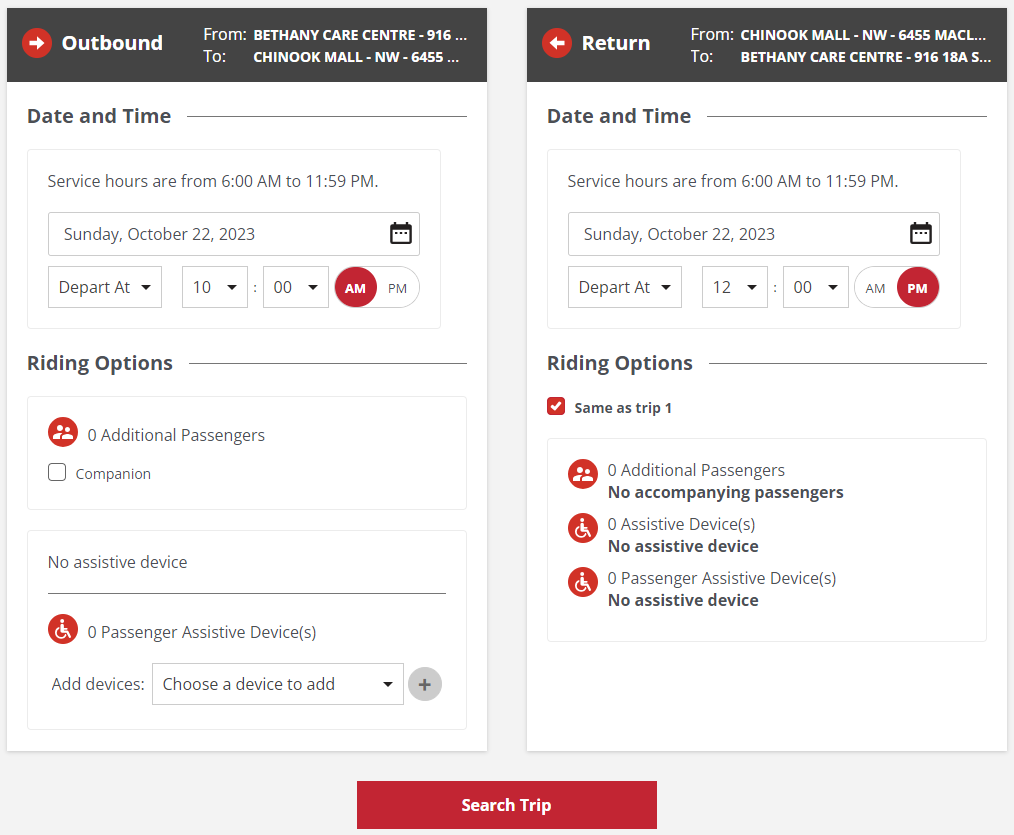
11. Next, choose the date and time of your outbound trip. Click on the calendar icon to select the date. You can book an occasional trip up to 4 days in advance.1
12. You can choose between "Depart at" which is the time you want to leave your origin, or "Arrive by" which is the time you want to be at your destination.
13. To select your arrival or departure time, choose the hours and minutes from the dropdown menus, then select AM or PM.
14. Now, choose your riding options. If you are travelling with another passenger, check the “Companion” box.
15. If you have any assistive devices listed on your profile, they will be shown here. If you are travelling with your assistive device, leave this box checked.
16. If your companion will be travelling with an assistive device, click “Choose a device to add”, select the device from the dropdown menu, then click the plus icon to add it to your trip.
17. To remove an assistive device, click on the “X”.
18. Enter the date and time of your return trip.
19. If your return riding options are the same as your outbound trip, leave “Same as trip 1” checked. If your return riding options are different, uncheck this box and make your selections.
20. Review your trip details and riding options to make sure they are correct, then click “Search Trip”.

21. You can review your outbound and return trip details on this page. If you want to see a map of either trip, click “Show on map”. This will show the location of your origin (A) and your destination (B). Click on the close window icon on the top left to close the map.
22. Click on “Modify Request” if you want to go back and change any details.
23. Click “Continue” if everything is correct.
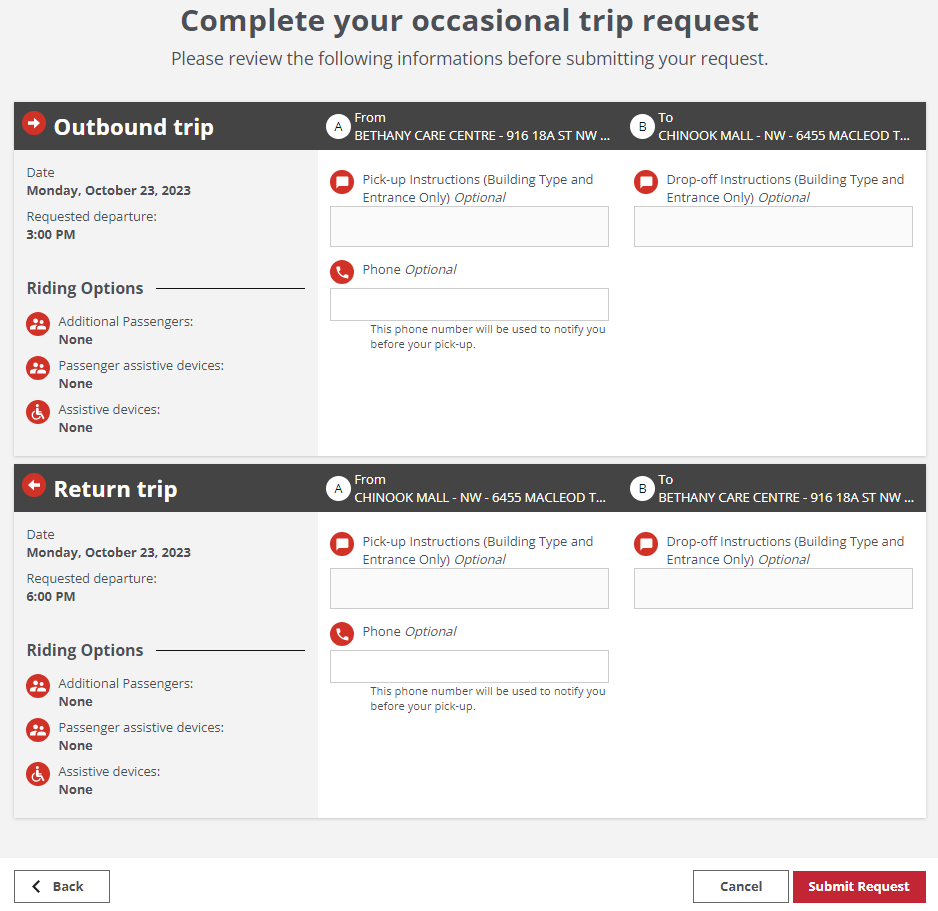
24. If you want to add a building type or specific entrance for your outbound or return trip, you can do that here. For landmark locations, you won’t be able to add custom instructions.
25. Enter a phone number if you want to be notified before your pick-up for each trip. The contact number on your profile will be entered by default.
26. Click “Submit Request”.
27. You have successfully booked an occasional round trip. From here you can email your trip details, book another trip, view all your scheduled trips, or view your trip details.
How to book an occasional multi trip
When you book a multi trip, you are booking 3 or more consecutive stops at one time.
1. To book an occasional multi trip, select “Book a Trip” from the top menu bar.
2. Select “Occasional Trip”.
3. Select the “Multi Trip” option.
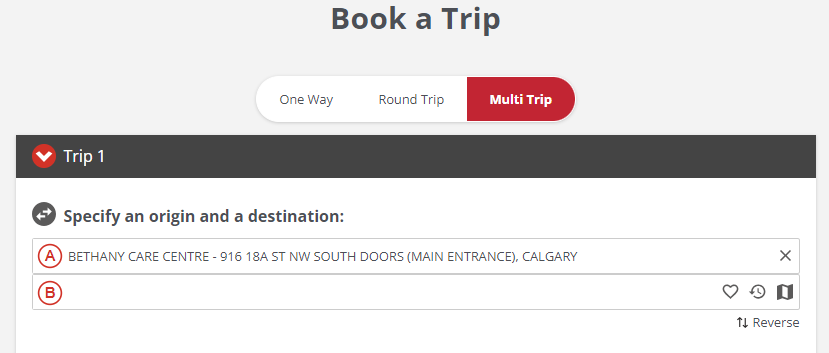
4. For Trip 1, start by filling in your origin, or starting location, labelled “A”. Your home address will be entered by default but can be changed.
5. Type in the address or landmark, click on the heart icon to select from your favourite addresses, or click on the clock icon to select from a list if recent addresses you’ve entered. You can also find the location you want on a map by clicking on the map icon. Landmarks are places that have pre-determined pick-up and drop-off locations and are identified with a building icon. Non-landmarks have a pin icon.
6. Next, fill in your destination, labelled “B”, by typing the address or landmark, selecting a favourite or recent address, or finding the location on the map.
7. To clear the address entered, click on the “X”.
8. If you want to reverse your origin and destination, click on the two arrows labelled “Reverse”.
9. Once you’ve entered an origin and a destination, you can view them on a map by clicking “Show on Map”.
10. To close the map, click “Hide Map” located on the bottom.
11. Next, choose the date and time of your first trip. Click on the calendar icon to select the date. You can book an occasional trip up to 4 days in advance.
12. You can choose between "Depart at" which is the time you want to leave your origin, or "Arrive by" which is the time you want to be at your destination.
13. To select your arrival or departure time, choose the hours and minutes from the dropdown menus, then select AM or PM.
14. Now, choose your riding options. If you are travelling with another passenger, check the “Companion” box.
15. If you have any assistive devices listed on your profile, they will be shown here. If you are travelling with your assistive device, leave this box checked.
16. If your companion will be travelling with an assistive device, click “Choose a device to add”, select the device from the dropdown menu, then click the plus icon to add it to your trip.
17. To remove an assistive device, click on the “X”.
18. To add additional trips, click on “Add Another Trip”.
19. Fill out the origin, destination, date and time.
20. If the riding options are the same as Trip 1, leave “Same as trip 1” checked. If your return riding options are different, uncheck this box and make your selections.
21. Continue to add trips until you have entered all your stops, then click “Search Trip”.
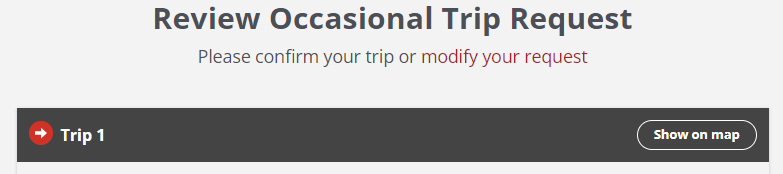

22. You can review the details each trip on this page. If you want to see a map of any of the trips, click “Show on map”. This will show the location of your origin (A) and your destination (B) for that trip. Click on the close window icon on the top left to close the map.
24. Click on “Modify Request” if you want to go back and change any details.
24. If everything is correct, click “Continue”.
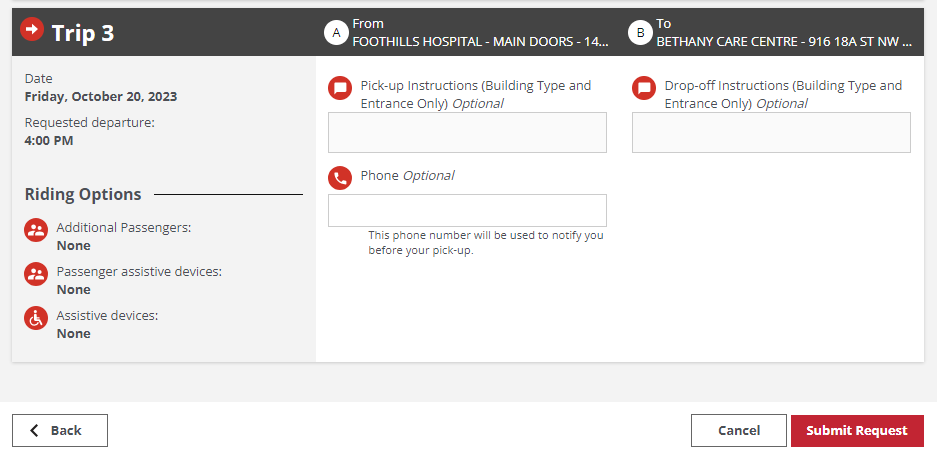
25. If you want to add a building type or specific entrance for any of your trips, you can do that here. For landmark locations, you won’t be able to add custom instructions.
26. Enter a phone number if you want to be notified before your pick-up for each trip. The contact number on your profile will be entered by default.
27. Click “Submit Request”.
28. You have successfully booked an occasional multi trip. From here you can email your trip details, book another trip, view all your scheduled trips, or view your trip details.